
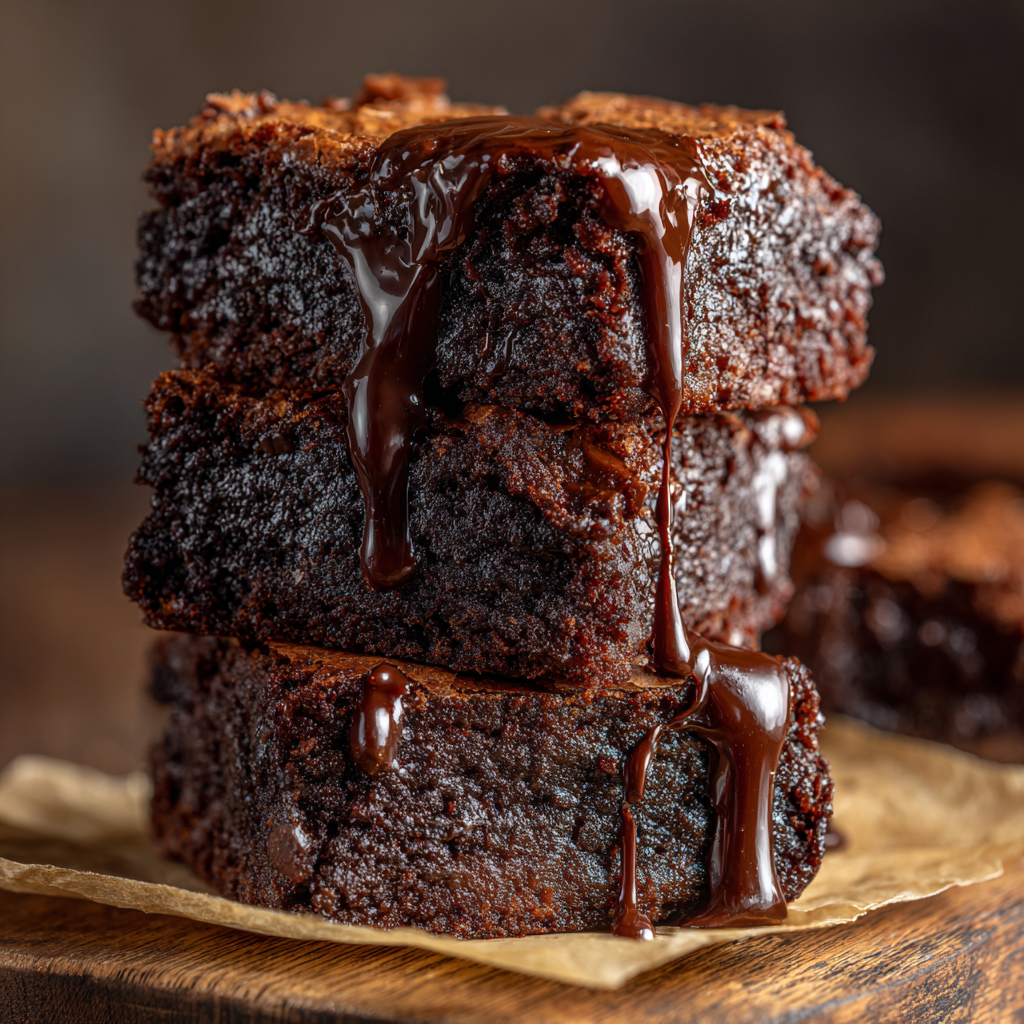
Mochi Brownies

A blissful fusion of fudgy chocolate and chewy mochi — these brownies deliver a dense, glossy center and a springy, tender chew that keeps everyone coming back for more.

This recipe blends two of my favorite textures into one unforgettable treat: the deep, fudgy chocolate of a classic brownie with the uniquely chewy, almost pillowy bite of mochi. I first stumbled upon this combination on a rainy afternoon when I had a bag of mochiko flour in the pantry and a craving for chocolate. The first batch came out slightly underbaked and impossibly sticky, but the next attempt — with a few timing tweaks — produced the ideal balance: dense, glossy interior with a delicate outer set. Since then, this version has become my go-to for potlucks and cozy dessert nights.
What makes these pieces special is the way the rice flour (mochiko) interacts with eggs and butter: instead of the crumbly crumb you expect from wheat flour, mochiko gives a supple and sticky structure that holds rich cocoa and butter beautifully. I like serving these slightly warmed so the chocolate topping softens, but they are almost equally enchanting at room temperature. Family members joke that these are a cross between a brownie and a chewy candy — and that is absolutely the point.
Why You'll Love This Recipe
- Delivers a dense, fudgy center and a delightfully chewy texture from sweet rice flour — you get two textures in one slice with minimal fuss.
- Ready with only about 15 minutes of active prep and just over an hour of baking time, making it perfect for weekend baking projects or dessert for a dinner party.
- Uses pantry-friendly ingredients like mochiko flour, cocoa powder, sugar, and eggs — nothing exotic besides your mochiko bag.
- Easy to scale: an 8-by-8-inch pan yields 12 generous pieces; double for a crowd and use a 9-by-13-inch pan adjusting bake time accordingly.
- Make-ahead friendly: these keep well at room temperature for a couple of days and maintain texture when gently reheated for a fresh-baked feel.
- Versatile for dietary swaps: you can use plant milks or dairy-free butter to reduce dairy, though texture and richness will shift slightly.
Personally, I love that this combination surprises people. The first time my partner tried one, he asked if I had added something special — just the right amount of cocoa and a scatter of chopped dark chocolate on top makes a direct, snappy chocolate hit that contrasts perfectly with the chew. Every gathering where I bring these, at least one person asks for the recipe.
Ingredients
- Mochiko (sweet rice flour) — 1 cup: Look for Koda Farms mochiko or a similar sweet rice flour labeled "mochiko". This flour is the key to the chewy texture; avoid substituting with regular rice flour which is much drier.
- Unsweetened cocoa powder — 1/2 cup: Dutch-process gives a rounder chocolate flavor and darker color; natural cocoa is brighter and slightly tangy. I used Dutch-process for this batch.
- Granulated white sugar — 1 cup: Provides structure and that classic brownie sweetness. You can use fine sugar to help dissolve more quickly if desired.
- Baking powder — 1 1/2 teaspoons: A small lift helps the mochi set without collapsing; measure carefully so you retain the dense texture.
- Unsalted butter — 5 tablespoons, melted: Salted will work but reduce added salt elsewhere. Melt and cool slightly so you don't scramble the eggs when combining.
- Large eggs — 2: Room temperature eggs whisk more evenly and help create the glossy, cohesive batter.
- Whole milk — 12 ounces (about 1 1/2 cups): Adds richness and hydrates the mochiko. You can swap with soy or full-fat oat milk for a dairy-free version (texture will be a touch different).
- Vanilla extract — 1 teaspoon: Enhances the chocolate notes and balances the sweetness.
- Chopped dark chocolate — 3 tablespoons: Scattered on top before baking to create gooey pockets and a shiny surface; use 60–70% cacao for best contrast.
Instructions
Preheat and prepare: Set the oven to 350°F (175°C). Line an 8-by-8-inch baking pan with parchment paper, leaving a slight overhang for easy lifting. Lightly grease the paper so the edges do not stick when you remove the cooled block. Whisk dry ingredients: In a medium bowl combine 1 cup mochiko, 1/2 cup unsweetened cocoa powder, 1 cup granulated sugar, and 1 1/2 teaspoons baking powder. Whisk until the mix is homogeneous and there are no lumps of cocoa or flour; this ensures even rising and color. Combine wet ingredients: In a large bowl whisk together 5 tablespoons melted butter (cooled slightly), 2 large eggs, 12 ounces whole milk, and 1 teaspoon vanilla until uniform and no streaks of egg remain. Tempering the eggs with cooled butter prevents curdling. Incorporate dry into wet: Add the dry mix to the wet in two additions, folding and whisking until evenly blended. The batter will be thicker than a typical cake batter but more fluid than a dense paste — this is normal for mochiko-based batters. Transfer and top: Pour the batter into the prepared pan, smoothing the surface with a spatula. Sprinkle 3 tablespoons chopped dark chocolate evenly across the top to create glossy melted pockets. Bake and test for doneness: Bake for 60–70 minutes. You want the edges to be set and the center to jiggle slightly but not slosh; a toothpick inserted should come out mostly clean with a few moist crumbs. Overbaking will dry the chewiness, so err on the side of slightly underbaked if unsure. Cool completely before slicing: Allow the block to cool fully in the pan to room temperature (at least 1 hour). Mochi continues to set as it cools; cutting while warm will cause sticky, messy slices. Use the parchment overhang to lift and slice neatly into 12 pieces.
You Must Know
- These keep at room temperature in a sealed container for 2–3 days; refrigeration will firm them but can dry the exterior — bring to room temperature before serving.
- Mochiko (sweet rice flour) is naturally gluten-free, but check the packaging for cross-contamination warnings if you need strict gluten-free certification.
- Using different milks alters richness: whole milk gives the creamiest mouthfeel; plant milks will reduce dairy flavor and may slightly change texture.
- Letting the block cool fully is essential — cutting hot will pull and tear, and the slices will be overly sticky and lose shape.
My favorite part is how each bite surprises you with a burst of chocolate and a satisfying chew that lingers. At a recent family brunch, my cousin compared these to her favorite childhood candy; everyone raved and asked for the recipe. Small adjustments — more chopped chocolate, a sprinkle of flaky sea salt — quickly personalize the outcome.
Storage Tips
Store slices in a single layer or with paper between layers in an airtight container at room temperature for up to 2–3 days. For longer keeping, freeze individually wrapped pieces for up to 3 months; thaw in the refrigerator overnight and bring to room temperature before serving to restore chewiness. Avoid refrigerating for short-term storage unless your kitchen is very warm; refrigeration firms the texture and can make the exterior less tender. If you must refrigerate, place slices in an airtight container with a small piece of bread to help maintain moisture.
Ingredient Substitutions
To reduce dairy, swap whole milk for oat or soy milk and replace butter with a dairy-free margarine or melted coconut oil (use refined coconut oil to avoid coconut flavor if undesired). Use caution: coconut oil gives a slightly different mouthfeel and may firm more when chilled. For a lower-sugar version, reduce sugar by 15–20% and increase dark chocolate percentage to maintain flavor intensity. If you cannot find mochiko, do not substitute with all-purpose flour; instead, seek sweet rice flour designated for mochi-style baking for the same chew.
Serving Suggestions
Serve slices slightly warm with a scoop of vanilla bean ice cream for contrast, or dust lightly with confectioners' sugar and a sprinkle of toasted sesame seeds for an elegant finish. These pair well with black coffee or smoky tea to cut the richness. For a party tray, cut into smaller squares and place on a platter with fresh berries and a drizzle of salted caramel to play up the chocolate. A flake of sea salt on each square right before serving brightens the chocolate notes.
Cultural Background
This hybrid draws inspiration from Japanese mochi — a traditional pounded rice cake celebrated for its chewy texture — and American fudgy brownies. Mochiko, a sweet rice flour, is commonly used in Japanese and Hawaiian desserts to create goods like mochi cakes and manju. Combining mochiko with Western baking ingredients creates a crossover dessert that nods to both traditions: the structure and chew of mochi with the bold chocolate profile of a brownie.
Seasonal Adaptations
In winter, fold in 1/2 teaspoon cinnamon and a pinch of ground ginger for warm spice; top with chopped candied orange peel for a festive touch. During summer, serve chilled with a scoop of citrus sorbet and fresh berries for a lighter contrast. For holiday parties, press a ribbon of salted caramel between two cooled layers or sprinkle toasted nuts on top before baking for extra crunch and visual appeal.
Meal Prep Tips
Bake the block on a weekend and portion into individual servings for grab-and-go treats. Wrap slices tightly in plastic wrap and place in stacked airtight containers for up to 3 days. For packed lunches, include a small napkin to absorb slight stickiness. Reheat briefly in a microwave (10–15 seconds) or in a preheated 300°F oven for 5–7 minutes to refresh the surface and soften any chilled chocolate pockets.
Whether you bring these to a gathering or keep them for late-night cravings, the combination of fudgy chocolate and chewy rice flour is reliably addictive. Give them time to set, serve with something creamy or tart, and enjoy the way familiar flavors surprise you all over again.
Pro Tips
Allow the mochi block to cool fully before slicing to ensure clean cuts and the proper chewy texture.
Use room-temperature eggs for better incorporation and a glossier finish in the batter.
If using Dutch-process cocoa, reduce baking soda adjustments; this recipe uses baking powder and Dutch-process cocoa for a darker flavor.
Lightly grease parchment to prevent sticking at the edges and to help lift the block cleanly from the pan.
If the top browns too quickly, tent with foil for the final 10–15 minutes of baking.
This nourishing mochi brownies recipe is sure to be a staple in your kitchen. Enjoy every moist, high protein slice — it is perfect for breakfast or as a wholesome snack any time.
FAQs about Recipes
Why should I let the mochi brownies cool completely?
Let the block cool completely at room temperature before slicing. Cutting while hot will create sticky, messy slices.
Can I make these dairy-free?
Yes, you can substitute whole milk with oat or soy milk and use dairy-free butter, but texture and richness may vary slightly.
How long do they keep?
Store at room temperature for 2-3 days in an airtight container; freeze up to 3 months for longer storage.
Tags
Mochi Brownies
This Mochi Brownies recipe makes perfectly juicy, tender, and flavorful steak every time! Serve with potatoes and a side salad for an unforgettable dinner in under 30 minutes.
Instructions
Preheat and prepare pan
Preheat oven to 350°F. Line an 8x8-inch pan with parchment leaving an overhang. Lightly grease the parchment to aid removal.
Mix dry ingredients
Combine mochiko, cocoa powder, sugar, and baking powder in a bowl. Whisk until evenly mixed and free of lumps.
Combine wet ingredients
Whisk melted butter (cooled), eggs, milk, and vanilla in a separate bowl until no streaks remain.
Combine wet and dry
Add dry ingredients to wet in batches, mixing until the batter is uniform and slightly thick.
Bake
Pour batter into prepared pan, sprinkle chopped dark chocolate on top, and bake 60–70 minutes until mostly set and a toothpick comes out mostly clean.
Cool and slice
Cool completely at room temperature (about 1 hour) before lifting from the pan and slicing into 12 pieces.
Last Step: Please leave a rating and comment letting us know how you liked this recipe! This helps our business to thrive and continue providing free, high-quality recipes for you.
Nutrition
Did You Make This?
Leave a comment & rating below or tag
@kitchenfunwithmy3sons on social media!
Categories:
You might also like...
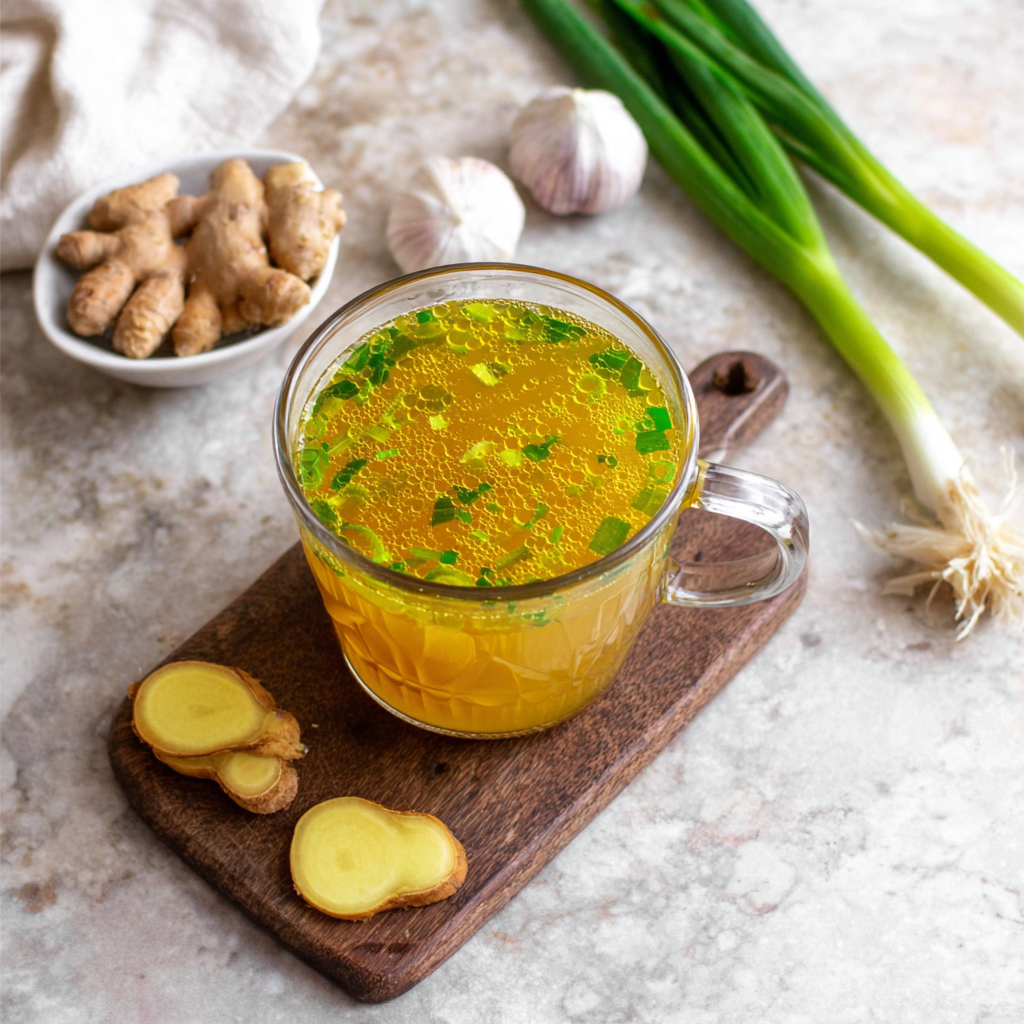
10 Minute Immune Boosting Broth
A fast, nourishing broth packed with garlic, ginger, miso, and turmeric to support immunity. Ready in 10 minutes and naturally dairy free, gluten free, and vegan.
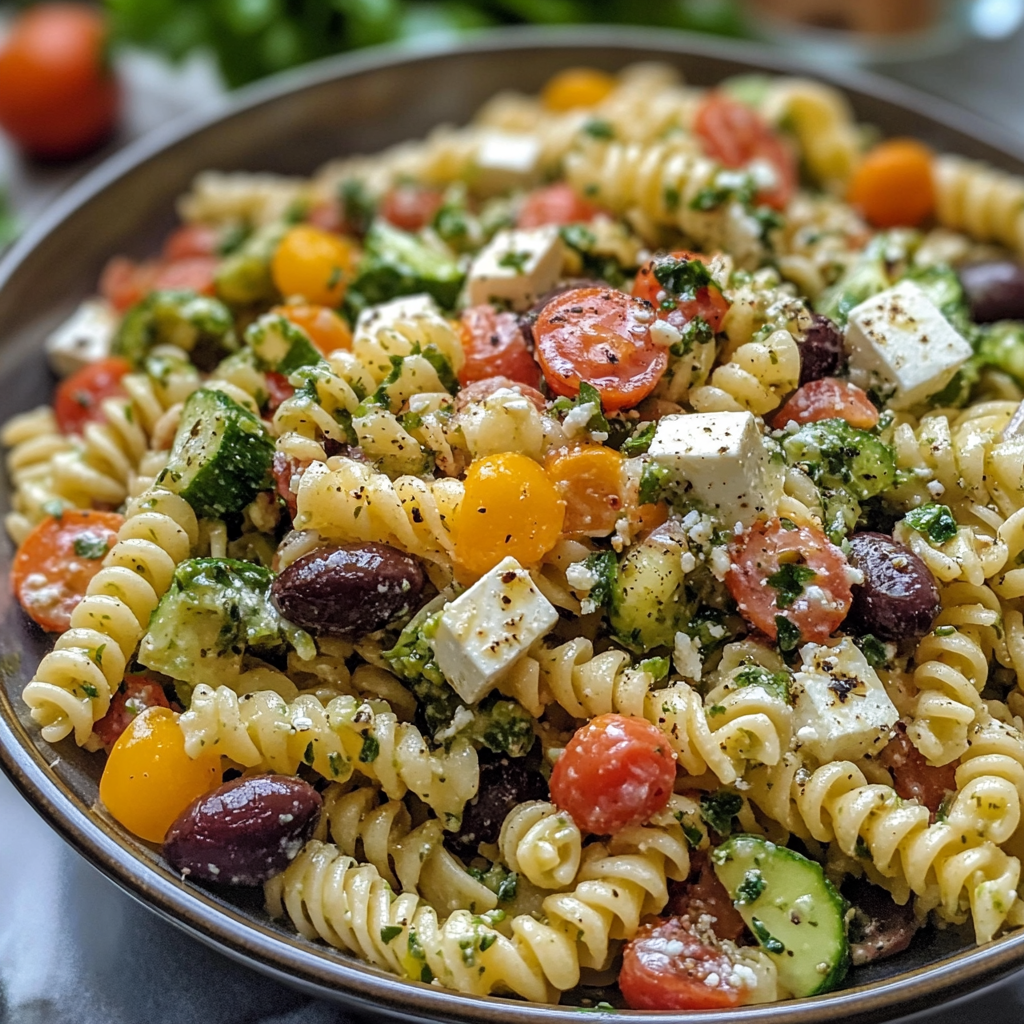
20-Minute Greek Pasta Salad
A bright, quick Greek-style pasta salad loaded with crunchy vegetables, Kalamata olives, tangy feta, and a creamy tzatziki dressing—ready in 20 minutes and perfect for summer gatherings.
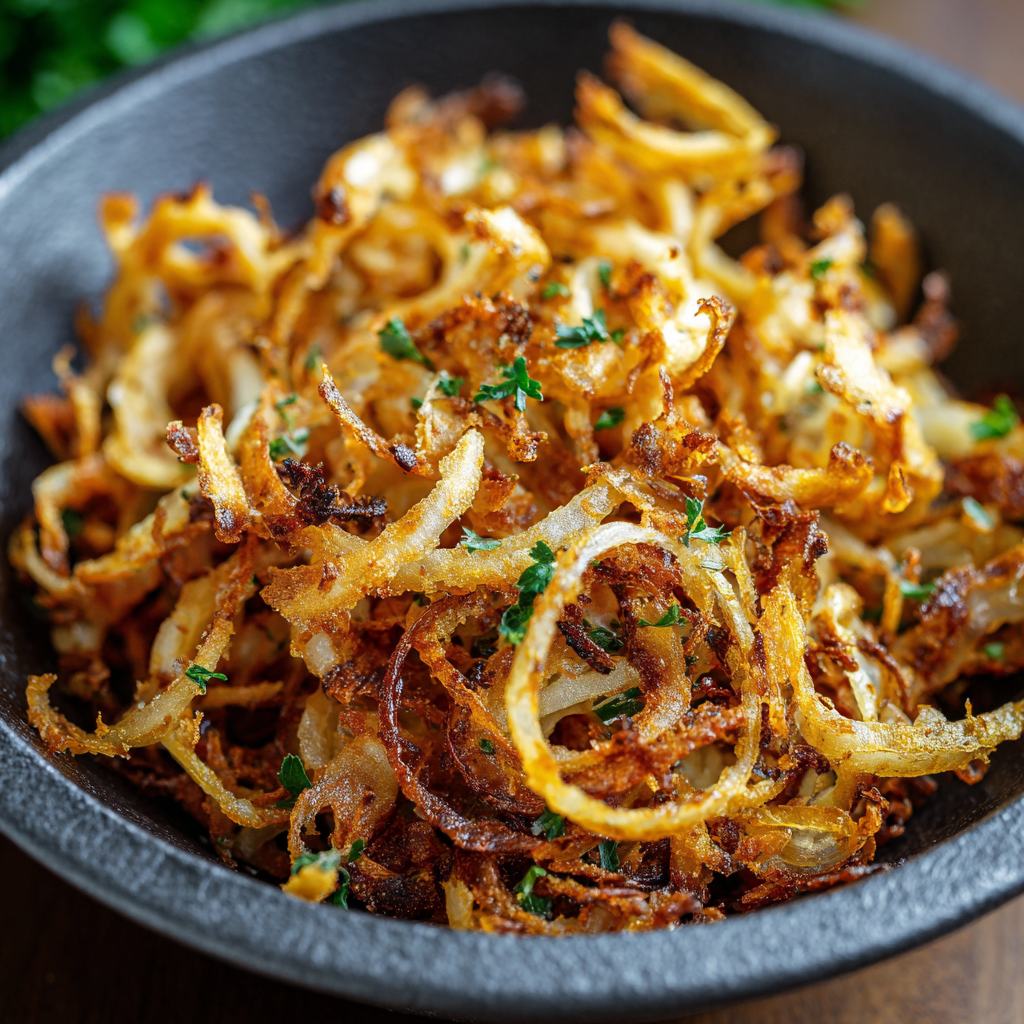
Air Fried Crispy Onion
Make perfectly caramelized crispy onions in an air fryer with just a touch of oil for a crunchy, savory topping that elevates any dish.
Did You Make This?
Leave a comment & rating below or tag @kitchenfunwithmysons on social media!
Rate This Recipe
Share This Recipe
Enjoyed this recipe? Share it with friends and family, and don't forget to leave a review!
Comments (1)
This recipe looks amazing! Can't wait to try it.
Comments are stored locally in your browser. Server comments are displayed alongside your local comments.
Hi, I'm Rachel!
What's Popular

Get My 30-Minute Meals email series!
Quick and easy dinner ideas delivered to your inbox.